Use the complete phone name
Check Settings → About phone. Record the model code, market variant and any 4G/5G, Pro, Plus or Lite suffix. The indexed Redmi Note 13 Pro 5G evidence is not a recommendation for a 4G model.
Check Settings → About phone. Record the model code, market variant and any 4G/5G, Pro, Plus or Lite suffix. The indexed Redmi Note 13 Pro 5G evidence is not a recommendation for a 4G model.
Package advice for stock OxygenOS or stock Realme software must stay scoped to that firmware. An update can change camera access; recheck a working setup after changing Android or ROM.
Main camera, selfie, ultrawide, telephoto, macro and video are separate checks. A community XML reference can help you start; it cannot substitute for a test on your own variant.
These 40 models have community XML references in the inspected indexes. A listing is evidence of contributed settings, not a guarantee of working lenses, video or every regional variant.
For example, S24 Snapdragon evidence does not establish Exynos support. Nord CE 3 is distinct from CE 3 Lite; Note 13 Pro 5G is distinct from a 4G model.
40 matching devices. Community evidence; check the variant details.
Confirm the regional hardware variant first. On the source's Snapdragon target, start with 25_4_23_setting_preference.xml and an unchanged photo mode before comparing the more customized file.
Choosing the configChoose the simple Snapdragon-labelled entry to establish a reference. If you try the jrosatti profile, its source describes tele, ultrawide, wide, front and wide black-and-white controls plus tone-curve/upscale changes; check each control's actual saved output.
Use the full model number and regional specification rather than the S20 FE product name alone. The Snapdragon-labelled recommendation is not evidence for an Exynos S20 FE.
With the jrosatti profile, test ordinary wide output before black-and-white or upscaling. That makes it easier to tell a lens-switch problem from a deliberate processing effect.
The older s20fe_snap_lmc8.4r15_basic.xml has model and Snapdragon labels. Keep its R15-index scope visible, and change only the XML when comparing it with a working setup.
Keep separate: Exynos S20 FE for Snapdragon-labelled files; Galaxy S20; Galaxy S20 Ultra
Profile source / instructions ↗ Profile source / instructions ↗
The current index explicitly labels the first profile Snapdragon. Do not extend that listing to Exynos S20 FE variants. ROM, Android version and front-camera behavior are not comprehensively documented.
Release: R16+ index; exact release unconfirmed
Package: No verified package recommendation
Author: Not attributed in index
Release: R16+ index; exact release unconfirmed
Package: No verified package recommendation
Author: Not attributed in index
Release: R15 index; exact release unconfirmed
Package: ruler or scan3d (source R15-index recommendation)
Author: Not attributed in index
For an Exynos phone considering the older profile, plan around the documented front-camera limitation. For HK-Leica, check the 3x night result early instead of evaluating only daylight main-camera photos.
Choosing the configThe current HK-Leica entry provides a concrete zoom/night warning but leaves chipset scope unspecified. The older Exynos entry is clearer about hardware and front-camera behavior; neither establishes a complete all-camera setup on every firmware.
Take the same low-light subject with 1x and 3x, then inspect the saved brightness. If HK-Leica's 3x picture is too dark, retain another working option for that situation.
The source specifically reports that the older Exynos S21U-R15-HDR profile does not support the front camera. Keep the stock-camera selfie path available if that limitation appears on your phone.
HK-Leica is a contributor profile name. Resolve the phone's variant and verify lens behavior rather than treating that name as a Snapdragon or Exynos assignment.
Keep separate: Galaxy S21; Galaxy S21 FE
The contributor identifies darker 3x night pictures as a known profile issue. Compare a main-camera shot and retain a working alternative for the scene; this website has not measured the effect.
Profile source / instructions ↗ Profile source / instructions ↗
The current HK-Leica profile does not specify chipset. Its source reports darker 3x zoom images at night. The older S21U-R15-HDR profile explicitly targets Exynos; its source says rear cameras work but the front camera does not.
Release: R16+ index; exact release unconfirmed
Package: No verified package recommendation
Author: Not attributed in index
Release: R15 index; exact release unconfirmed
Package: ruler or scan3d (source R15-index recommendation)
Author: Not attributed in index
Identify Snapdragon or Exynos before importing the older profile: S22U-SD-LMCr15-ArcideV7.xml and LMC-S22U-Exynos.xml are separate choices.
Choosing the configUse the explicitly labelled older hardware entry when you need a clear variant match. Treat the newer javasabr profile as a separate community experiment whose chipset and release scope require confirmation.
Name saved backups with SD or Exynos alongside the APK release. This prevents an accidental cross-variant import when several S22 Ultra files are in the same folder.
The index has a different S22/S22+ heading. A base-model R18 assignment cannot be transferred to the Ultra listing simply because both say S22.
The older S22 Ultra section recommends ruler or scan3d. After installing a matching build, establish main-camera photo saving before trying auxiliary buttons.
Keep separate: Galaxy S22; Galaxy S22+; Opposite chipset variant for SD/Exynos-labelled files
Match the phone's regional hardware variant to the explicit source label. The files are separate, and this catalog does not establish that one substitutes for the other.
Profile source / instructions ↗ Profile source / instructions ↗
The newer index profile does not specify regional chipset. The R15 index provides separate Snapdragon and Exynos files; keep those separate. A package choice cannot remove all hardware and ROM differences.
Release: R16+ index; exact release unconfirmed
Package: No verified package recommendation
Author: Not attributed in index
Release: R15 index; exact release unconfirmed
Package: ruler or scan3d (source R15-index recommendation)
Author: Not attributed in index
Release: R15 index; exact release unconfirmed
Package: ruler or scan3d (source R15-index recommendation)
Author: Not attributed in index
Read the installed LMC release, then select its corresponding documented S23 Ultra file. Keep the exact filename and APK package in the backup name.
Choosing the configRelease alignment provides a firmer starting point than a universal 'best S23 Ultra XML' claim. The R16 jajo entry also tells users to choose a Samsung package without naming an exact option.
If the installed APK is R17, begin with the R17-assigned file instead of jumping to the R18 file because it appears newer. Compare upgrades as an APK-and-profile pair.
Photograph the same distant subject with each exposed lens control and inspect the saved field of view and detail. A visible zoom button is not enough to prove that the intended lens is active.
The source provides distinct S23/S23+ and S23 Ultra entries. Select the Ultra filename rather than the similarly named base-series JavaSaBr profile.
Keep separate: Galaxy S23; Galaxy S23+; Galaxy S23 FE
Yes. The source explicitly assigns the three listed profiles to those releases. That assignment is contributor evidence rather than a firmware-wide test by this website.
Profile source / instructions ↗ Profile source / instructions ↗
The index explicitly assigns R18, R17 and R16 to these current files. The R16 entry says to pick a Samsung package. Full camera/ROM coverage has not been tested here.
Release: R18
Package: No verified package recommendation
Author: Not attributed in index
Release: R17
Package: No verified package recommendation
Author: Not attributed in index
Release: R16
Package: a Samsung package (exact option not specified in this entry)
Author: Not attributed in index
Release: R15 index; exact release unconfirmed
Package: ruler or scan3d (source R15-index recommendation)
Author: Not attributed in index
Confirm the regional hardware variant. For the source's Snapdragon target, consider zZeRoZzAnDoNeZz_2025-03-10 with R18; for Exynos, stop at 'no verified recommendation in this catalog'.
Choosing the configThe explicit Snapdragon/R18 scope is the reason to shortlist this file. Shared S24/S24+ wording does not include S24 Ultra, and older-generation suggestions should remain optional experiments.
Keep the complete S24 model number with its regional hardware specification. The same marketed S24 name is insufficient to select the Snapdragon-only entry.
Once the hardware matches, verify an ordinary main-camera photo before adding old S22/S23 profiles. This gives you a useful baseline for any later comparison.
If one camera fails, note the package, Android/One UI version and failing lens. 'S24 crashes' is less actionable than a reproducible mode-specific report.
Keep separate: Exynos S24; Galaxy S24 Ultra
The listed profile explicitly says Snapdragon only. These sources do not establish an Exynos S24 recommendation.
The current listing groups S24/S24+ and explicitly says Snapdragon only. No Exynos recommendation is verified in these two indexes. Older S22/S23 profiles are only suggested as possibilities requiring testing.
Release: R18
Package: No verified package recommendation
Author: Not attributed in index
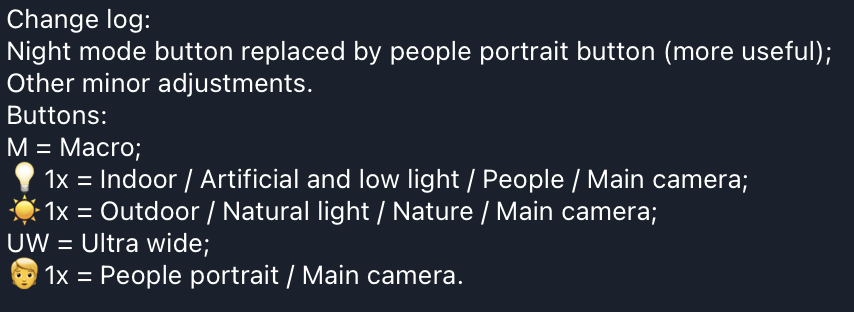
Match the EAC profile to the installed release. With R17 EACv9, read the button legend before treating every 1x button as identical.
Choosing the configUse LMC8.4R18_M51_EACv7.xml with its R18 scope, EACv9 with R17 or EACv6 with R16. The older EACv3 has a source-reported R15 test, so keep that claim attributed to the contributor.
In R17 EACv9, the bulb-marked 1x is intended for indoor/artificial or low light, and the sun-marked 1x for outdoor/nature. Compare them on the same scene to learn the processing difference.
The R17 changelog replaces a night button with a people-portrait main-camera button. It is a profile-specific interface change; older XML button layouts may differ.
The same legend labels M as macro and UW as ultrawide. Save one focused sample from each after the main camera works, rather than assuming the labels establish successful capture.
Keep separate: Galaxy M52; Galaxy M53; Galaxy A51 without its own entry
EACv9's R17 instructions assign them to indoor/artificial light, outdoor/nature and people portraits. They are processing/subject choices for the main camera.
Profile source / instructions ↗ Profile source / instructions ↗ Profile source / instructions ↗
Current source explicitly records profiles created with R18, R17 and R16. The older profile is source-reported tested with R15, not tested by this website. Custom button layouts and camera behavior depend on the selected file.
Release: R18
Package: No verified package recommendation
Author: eacampos
Release: R17
Package: No verified package recommendation
Author: eacampos
Release: R16
Package: No verified package recommendation
Author: eacampos
Release: R15
Package: ruler or scan3d (source R15-index recommendation)
Author: Not attributed in index
Confirm the full A71 model number and avoid selecting this entry by an A71 5G search alone. Save a main-camera daylight photo with default LMC before importing Samsung-Galaxy-A71.xml.
Choosing the configThis file is shortlisted because of its exact A71 heading, not because the source ranks it or verifies every camera. Keep its 'R16+ index; exact release unconfirmed' scope visible.
Take a face, a white object and a shaded textured surface in one ordinary scene. The same samples make color casts and excessive sharpening easier to judge after loading the sparse profile.
The A71 entry lacks a front-camera report. Include a saved selfie in the initial check so that a good rear photo does not obscure a mode you regularly need.
The A71 section does not supply the older S-series ruler/scan3d advice. Keep package choice as an unresolved setup detail unless a relevant instruction substantiates it.
Keep separate: Galaxy A71 5G without matching evidence
Only a community config listing is verified. The source does not specify chipset, region, package, Android version or tested release; do not assume A71 5G or all ROMs are covered.
Release: R16+ index; exact release unconfirmed
Package: No verified package recommendation
Author: Not attributed in index
Use the exact A73 listing as a community trial. Photograph foliage alongside a neutral object with the current setup before importing Green-City-Nature.xml.
Choosing the configThe exact A73 heading justifies a shortlist; the name's City/Nature wording does not supply a validated look description. Judge the imported result against the reference rather than a promised effect.
A green subject alone can conceal a color cast. Include a white or gray object when comparing this nature-named profile, and inspect both in the saved photograph.
Compare leaves, hair or fabric at the same viewing size rather than comparing only the overall saturation. Retain the profile only if its processing suits your subject.
The index does not assign this file to a specific LMC release. Record the actual APK and firmware with any success report so another A73 owner has a reproducible starting point.
Keep separate: Galaxy A72
Only a community config listing is verified. Region, exact release, package and all-camera behavior are not documented in the index.
Release: R16+ index; exact release unconfirmed
Package: No verified package recommendation
Author: Not attributed in index
For an R17+ experiment, use the Exotic file only with its documented R17+ scope. For a simpler comparison, keep the exact-model Comrade entry as a separate reference rather than mixing the two imports.
Choosing the configThe Comrade file gives an exact-model starting point. Exotic--Vol-3--LMC-R15-for-MTK.xml is a second option selected by its source assignment, not by the R15 label embedded in its name.
Do not downgrade to R15 solely because the Exotic filename says R15. The contributor's current source assignment is R17+.
Use a folder label or filename note that includes Pro. The source has separate headings; the shared Note 8 number does not make their camera settings interchangeable.
Use a bright window and a darker interior in the same frame. Inspect saved highlight detail and shadow noise while changing only the XML, so you can choose the more useful processing on your phone.
Keep separate: Redmi Note 8; Redmi Note 8T
The inspected source explicitly marks it for R17+. Preserve that assignment rather than interpreting the embedded filename label as a tested-release statement.
Profile source / instructions ↗ Profile source / instructions ↗
The source explicitly marks Exotic--Vol-3--LMC-R15-for-MTK as for R17+ despite R15 in the filename. Do not confuse Note 8 Pro with Note 8. Filename labels alone do not demonstrate compatibility.
Release: R16+ index; exact release unconfirmed
Package: No verified package recommendation
Author: Not attributed in index
Release: R17+
Package: No verified package recommendation
Author: Not attributed in index
Release: R16+ index; exact release unconfirmed
Package: No verified package recommendation
Author: Not attributed in index
Release: R15 index; exact release unconfirmed
Package: No verified package recommendation
Author: Not attributed in index
Check the full regional model/codename. Use the source section that matches joyeuse or curtana; use Redmi-Note-9-Pro-5G-gauguinpro-LMC-8.4.300.xml only for the separately listed gauguinpro 5G target.
Choosing the configA shared filename can have more than one documented target, but the grouping must come from the source. The 5G file is not a substitute for a 4G Note 9 Pro.
Use joyeuse, curtana or gauguinpro alongside the XML and APK release. This prevents a later import from losing the regional decision that made the file relevant.
The selected Fsio entry is in the current index, but its filename does not itself establish an R18 compatibility test. Record the APK actually used in your successful setup.
Photograph a fixed distant object with each exposed rear control. Inspect whether the saved angle of view changes as expected before interpreting a lens button as working.
Keep separate: gauguinpro 5G for joyeuse/curtana 4G selections; Redmi Note 9; Redmi Note 9 Pro Max without its own entry
The source groups Note 9 Pro India with Note 9S under curtana. Use that exact section; the gauguinpro entry is the separately listed 5G model.
The index separates global Note 9 Pro joyeuse, India Note 9 Pro/Note 9S curtana, and Note 9 Pro 5G gauguinpro. Match the exact regional model and codename. The 5G entry is not a recommendation for 4G models.
Release: R16+ index; exact release unconfirmed
Package: No verified package recommendation
Author: Not attributed in index
Release: R16+ index; exact release unconfirmed
Package: No verified package recommendation
Author: Not attributed in index
Release: R16+ index; exact release unconfirmed
Package: No verified package recommendation
Author: Not attributed in index
Begin with RN10Pro-intro555-v12.xml under the exact Redmi Note 10 Pro heading. Keep RTTG-Dlsr-Prime.xml as a separate style comparison after ordinary photo saving works.
Choosing the configThe exact-model current heading is the basis for the first choice. DSLR in the second filename is an aesthetic label, not evidence of matching a DSLR's optics, sensor or depth of field.
Use hair, leaves and a face in the same saved scene. Check whether the profile's sharpening and color suit the subject, with both results viewed at equal size.
LMC-8.4-V8-XML-for-Mi-Note-10-and-Pro.xml is filed under Redmi Note 10 Pro but names Mi Note 10. Prefer the unambiguous current choices until stronger target evidence exists.
The selected entries do not establish a universal all-lens result. Make a short saved-photo checklist for the main, front and any exposed auxiliary controls before replacing the stock-camera routine.
Keep separate: Xiaomi Mi Note 10; Xiaomi Mi Note 10 Pro; Redmi Note 10 without its own entry
No hardware equivalence is established. RTTG-Dlsr-Prime is a community processing label; judge its saved color, sharpening and portrait output on the phone.
Profile source / instructions ↗ Profile source / instructions ↗
Current source lists the model directly. The older filename says Mi Note 10 although indexed under Redmi Note 10 Pro; treat that as an ambiguous legacy listing. No universal lens or Android-version guarantee is documented.
Release: R16+ index; exact release unconfirmed
Package: No verified package recommendation
Author: Not attributed in index
Release: R16+ index; exact release unconfirmed
Package: No verified package recommendation
Author: Not attributed in index
Release: R15 index; exact release unconfirmed
Package: No verified package recommendation
Author: Not attributed in index
Confirm the full 5G model identity before trying XML-RN12PRO-LMC8.4-V3-RUBY.xml or XML-RN12P5G-LMC-8.4-R16-V2.1.xml. A similarly named 4G or Pro+ phone needs its own evidence.
Choosing the configBoth files are model-identified community candidates. V3, V2.1 and R16 in their names do not provide measured quality comparisons or blanket release compatibility.
Do not let the omitted network suffix in a page heading override the more specific identifiers in the selected files. Keep the exact full model in any saved setup note.
Use a face, foliage and a neutral object for both files. Change only the XML so that lighting differences do not decide which result looks more natural.
A profile revision and an APK release are separate pieces of information. Record both rather than assuming the higher XML revision is automatically more stable.
Keep separate: Redmi Note 12 Pro 4G; Redmi Note 12 Pro+ without its own evidence; Redmi Note 12
The selected filenames identify RUBY/RN12P5G. This catalog scopes them to that listed 5G case and does not establish a distinct 4G recommendation.
The index heading omits 4G/5G but filenames identify RUBY and RN12P5G. Treat these as the listed 5G/RUBY profiles; do not extend to a similarly named 4G phone or Pro+ without its own evidence.
Release: R16+ index; exact release unconfirmed
Package: No verified package recommendation
Author: Not attributed in index
Release: R16+ index; exact release unconfirmed
Package: No verified package recommendation
Author: Not attributed in index
Confirm 5G first, then compare PowerFull.xml with GarnetVividAllLens.xml as separate current candidates. Keep the exact model and APK release in your notes.
Choosing the configUse the explicit 5G heading as the model-match evidence. AllLens in a filename remains a contributor label; test the exposed controls rather than advertising verified all-camera access.
A search for Note 13 Pro can reach both marketed variants. This catalog's current recommendation applies to the source's 5G heading; an unmatched 4G search should return no verified recommendation.
For GarnetVividAllLens.xml, save a photo from each exposed lens control and compare framing. A successful main-camera image does not validate the other controls.
The shared heading is Poco X6 5G, while X6 Pro has its own source entry. The Pro suffix changes the target and must remain visible in the finder.
Keep separate: Redmi Note 13 Pro 4G; Redmi Note 13 Pro+; Poco X6 Pro
The current source explicitly groups Note 13 Pro 5G and Poco X6 5G. That grouping does not establish Note 13 Pro 4G or Poco X6 Pro support.
Profile source / instructions ↗ Profile source / instructions ↗
The current heading explicitly groups Redmi Note 13 Pro 5G and Poco X6 5G. The older generic Pro listing is region/model ambiguous. No distinct Note 13 Pro 4G recommendation is verified from these indexes.
Release: R16+ index; exact release unconfirmed
Package: No verified package recommendation
Author: Not attributed in index
Release: R16+ index; exact release unconfirmed
Package: No verified package recommendation
Author: Not attributed in index
Release: R15 index; exact release unconfirmed
Package: No verified package recommendation
Author: Not attributed in index
Release: R15 index; exact release unconfirmed
Package: No verified package recommendation
Author: Not attributed in index
Use hehehaw.xml as the first candidate if you want to verify the source's explicit camera report. Keep X3 Pro separate from the X3 NFC profile.
Choosing the configThe all-camera report is a reason to test hehehaw early, not a promise for every firmware. Compare RHqDR as a second profile once you know which saved camera modes work.
Save a photo from each exposed camera and inspect its pixel dimensions. Note which lenses work on your firmware instead of repeating the source's all-camera claim as your own result.
The index provides separate RHqDR filenames for X3 Pro and X3 NFC. Read the suffix before importing, particularly when both files are downloaded together.
Use a shaded textured subject, then view both profiles at the same size. Judge the saved detail and noise after processing completes, with optional upscaling left out of the initial comparison.
Keep separate: Poco X3 NFC; Poco X3 without matching evidence
No. The source describes hehehaw that way; the checklist asks you to verify saved photos on your own APK and firmware.
Profile source / instructions ↗ Profile source / instructions ↗
The source describes hehehaw as stable with all cameras at native resolution, but this is a community report, not our test. Keep X3 Pro separate from X3 NFC.
Release: R16+ index; exact release unconfirmed
Package: No verified package recommendation
Author: Not attributed in index
Release: R16+ index; exact release unconfirmed
Package: No verified package recommendation
Author: Not attributed in index
Release: R15 index; exact release unconfirmed
Package: No verified package recommendation
Author: Not attributed in index
Confirm X4 Pro 5G. Begin with Poco-X4Pro-5G.xml as a plainly model-identified current candidate, then compare Blaze3.0 separately if needed.
Choosing the configThe current candidates provide an exact X4 Pro target, but Blaze's r18f1 filename label is not by itself an independently documented release test.
X4 GT has separate community instructions. Do not carry its camera or HDR-mode advice into an X4 Pro setup merely because both names begin X4.
The older shared heading is X4 Pro 5G/Redmi Note 11 Pro 5G. It does not establish files for every Redmi Note 11 variant.
After a still reference works, include a simple everyday movement test. Check the saved sharpness and capture reliability rather than selecting by the number in the filename.
Keep separate: Poco X4 GT; Redmi Note 11 Pro variants outside the source's explicit 5G grouping
Profile source / instructions ↗ Profile source / instructions ↗
The older index groups X4 Pro 5G with Redmi Note 11 Pro 5G. Do not confuse X4 Pro with X4 GT; release labels within filenames are not proof that every ROM works.
Release: R16+ index; exact release unconfirmed
Package: No verified package recommendation
Author: Not attributed in index
Release: R16+ index; exact release unconfirmed
Package: No verified package recommendation
Author: Not attributed in index
Release: R15 index; exact release unconfirmed
Package: No verified package recommendation
Author: Not attributed in index
Confirm X5 Pro rather than X5, then try sanji22.xml. Preserve your working settings before comparing DevilNoobIN.
Choosing the configNeither selected file carries a documented package or exact tested release in the index. The recommendation is a model-heading shortlist, not a quality ranking.
A filename that says X5 5G under an X5 Pro heading is ambiguous. Use the unambiguous selected entries instead of silently assigning it Pro compatibility.
Use the same face, fabric and lighting with sanji22 and DevilNoobIN. Compare skin color, sharpening and focus in saved files rather than their contributor names.
The source does not supply a package rule for these files. Keep the actual package and firmware with a missing-lens report before deciding that a different XML alone will fix it.
Keep separate: Poco X5
The current index also has a Poco-X5-5G.xml filename under X5 Pro. That ambiguous file is deliberately not recommended here. Distinguish X5 Pro from X5; package and exact tested release are not documented for the chosen files.
Release: R16+ index; exact release unconfirmed
Package: No verified package recommendation
Author: Not attributed in index
Release: R16+ index; exact release unconfirmed
Package: No verified package recommendation
Author: Not attributed in index
Start with poco_x6_pro_lmc_8.4_r18_v1.xml as the model-specific reference. Compare leica-superb separately if you prefer its described restrained color style.
Choosing the configThe exact-model file is the straightforward target match. Leica-superb is a look option supported by a source description, not an official Leica/iPhone profile or a hardware upgrade.
Use a face with a white or gray object to compare the two profiles. A vivid display or green landscape alone can conceal color casts in a natural-color choice.
Those models have a separate grouped source heading. Keep X6 Pro in the filename and finder selection.
The exact-model filename includes r18, but the index does not independently state the release assignment. Keep the actual working APK release with your saved profile.
Keep separate: Poco X6; Redmi Note 13 Pro 5G
The source describes leica-superb.xml as natural color similar to an iPhone-style look. Treat it as a community processing option and compare its actual output on your phone.
Source describes leica-superb as natural color similar to an iPhone-style look. This is an artistic profile label, not hardware equivalence or brand affiliation. Keep X6 Pro separate from X6/Redmi Note 13 Pro 5G.
Release: R16+ index; exact release unconfirmed
Package: No verified package recommendation
Author: Not attributed in index
Release: R16+ index; exact release unconfirmed
Package: No verified package recommendation
Author: Not attributed in index
Confirm that the phone matches the source's F3/Mi 11X/K40 grouping. Compare Tempest as an exact F3-named reference with f3-leica as the separate style option.
Choosing the configThe shared source heading supports the market-name grouping. The old PQ-F3-Pro-R13.xml label does not establish a physical 'F3 Pro' target or a tested R13 setup for every grouped model.
Write F3/Mi 11X/K40 or Alioth only when it matches the phone and the source heading. Do not expand it to F3 GT because of the F3 name.
Compare a face, bright sky and shaded texture using f3-leica and Tempest. Keep a non-style reference so that a deliberate look is not mistaken for a camera fault.
PQ-F3-Pro-R13.xml is catalogued in the older R15 index. Its embedded words are not sufficient proof of a release-specific or extra-model recommendation.
Keep separate: Poco F3 GT
The inspected source deliberately groups those three market names. Match that exact group and retain the phone's full identity in your setup note.
Profile source / instructions ↗ Profile source / instructions ↗
The source groups Poco F3, Mi 11X and Redmi K40, with Alioth in the older index. Do not extend to F3 GT. The old filename R13 is recorded as a label within an R15 index, not a verified cross-release test.
Release: R16+ index; exact release unconfirmed
Package: No verified package recommendation
Author: Not attributed in index
Release: R16+ index; exact release unconfirmed
Package: No verified package recommendation
Author: Not attributed in index
Release: R15 index; exact release unconfirmed
Package: No verified package recommendation
Author: Not attributed in index
Use bubnois-v2.xml with its documented R17 requirement and ordinary photo mode first. Leave the three discouraged processing options off during the initial comparison.
Choosing the configBubNois is the most instruction-rich selected F4 option. SPYdr-Stable-v2.xml remains a separate community alternative; Stable in that filename is not a measured stability result from this website.
Pair BubNois v2 with R17 before experimenting across releases. The contributor explicitly names that requirement.
Use daylight fine detail and a dim textured area to compare the profile's stated goals. Inspect halos or crunchy edges at equal viewing size rather than increasing every sharpening option.
The BubNois contributor advises against those options for this setup. If you change them later, compare one option at a time and preserve the supplied reference.
Keep separate: Poco F4 GT
Those are the contributor's profile-specific notes. Begin with that documented baseline rather than carrying settings from another XML into the comparison.
Profile source / instructions ↗ Profile source / instructions ↗ Profile source / instructions ↗
The source groups F4 with Redmi K40S. Do not extend to F4 GT. Extra profile read-me information is linked but camera and ROM coverage is not comprehensively verified here.
Release: R17
Package: No verified package recommendation
Author: Not attributed in index
Release: R16+ index; exact release unconfirmed
Package: No verified package recommendation
Author: Not attributed in index
Release: R15 index; exact release unconfirmed
Package: No verified package recommendation
Author: Not attributed in index
Try TruePic-V1.xml as the first selected F5 candidate, saving a reference before comparing DtuxStatementV2.3Standard.
Choosing the configBoth are selected because they appear under the exact F5 heading. The source supplies no package or exact tested-release assignment for them.
Include a face, a neutral object and small lettering in one scene. Judge color casts and readable detail in the saved file rather than interpreting the profile name as a validated accuracy claim.
The source has a separate F5 Pro section. A filename elsewhere that includes F5/F5PRO is not enough to substitute it for the selected F5 files without its instructions.
Dtux's Standard name does not establish default behavior for every ROM. Check ordinary photo, front camera and a short clip independently on your installed setup.
Keep separate: Poco F5 Pro
The F5 source lists these two files. A separate F5 Pro entry exists; do not treat its file as interchangeable without further evidence.
Release: R16+ index; exact release unconfirmed
Package: No verified package recommendation
Author: Not attributed in index
Release: R16+ index; exact release unconfirmed
Package: No verified package recommendation
Author: Not attributed in index
Confirm the exact F6 target and begin with a saved ordinary main-camera photo. Keep a backup before importing PIXP_v5_-_Peridot.xml.
Choosing the configThe exact F6 heading and Peridot-labelled file justify the shortlist. The v5 label does not establish a tested LMC release or a quality advantage over another phone's file.
Record the actual model, region and firmware alongside the profile name. Do not use the codename label to extend the file to F6 Pro.
Use a focused daylight main photo as the first test, then check front and any exposed auxiliary control. This locates a basic camera-ID problem before color tuning complicates the result.
If a mode crashes, record its exact control and the APK/package. The sparse source instructions leave these observations especially valuable for deciding the next setup change.
Keep separate: Poco F6 Pro
The config filename identifies Peridot, but the index does not record package or exact tested release. Do not extend this listing to F6 Pro.
Release: R16+ index; exact release unconfirmed
Package: No verified package recommendation
Author: Not attributed in index
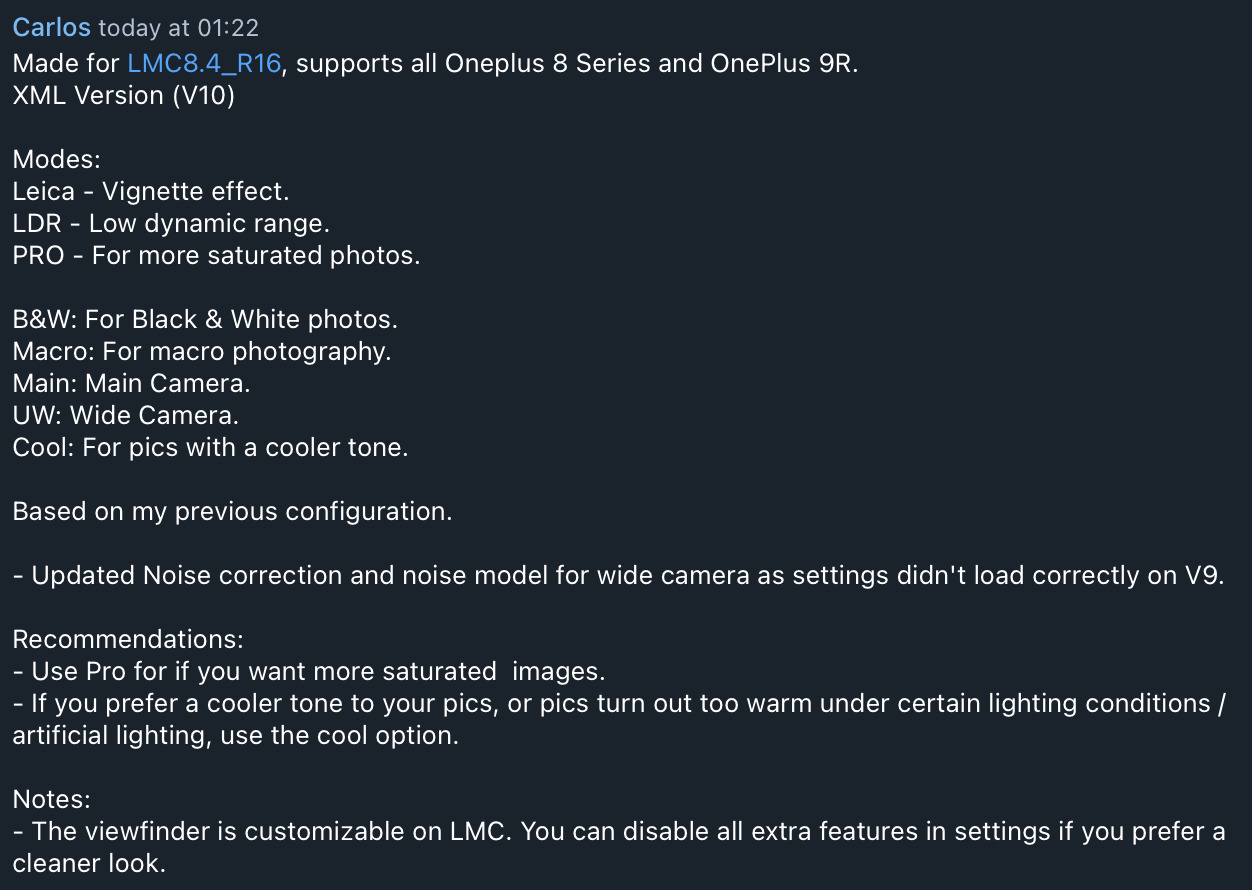
For the documented Carlos V10 starting point, use R16 and a stock-OOS snapcam/aweme package as described by the source. Establish ordinary main-camera capture before changing the style buttons.
Choosing the configCarlos-V10-LMC-8T-9R.xml has fuller instructions than the selected older alternatives. Its wide-camera noise-model changes and R16 origin are contributor information rather than measured improvements here.
If auxiliary controls are missing on stock OxygenOS, confirm whether the installed package is snapcam or aweme as documented. A different style XML alone does not settle camera access.
Carlos V10 describes Cool for warmer/artificial-light scenes and PRO for more saturated output. Compare a neutral object under indoor light before deciding which processing you prefer.
V10's notes mention correcting wide-camera noise settings that had not loaded correctly in V9. Include a saved wide scene with shadows when comparing the supplied profile.
Keep separate: OnePlus 8 Pro for the 8T/9R XML; OnePlus 9; OnePlus 9 Pro
Snapcam or aweme is documented for stock OxygenOS. Keep that scope visible; it is not a guarantee for every OxygenOS version or custom ROM.
Profile source / instructions ↗ Profile source / instructions ↗ Profile source / instructions ↗
Both indexes say snapcam or aweme is needed to access all cameras on stock OxygenOS. That recommendation has a stock-OOS scope and does not guarantee all cameras on every Android/OOS version.
Release: R16
Package: snapcam or aweme on stock OxygenOS
Author: Not attributed in index
Release: R15 index; exact release unconfirmed
Package: snapcam or aweme on stock OxygenOS
Author: Not attributed in index
Release: R15 index; exact release unconfirmed
Package: snapcam or aweme on stock OxygenOS
Author: Not attributed in index
For the instruction-rich V10 setup, use Carlos-V10-LMC-8Pro.xml with its R16 origin and the documented snapcam/aweme advice on stock OxygenOS.
Choosing the configKeep the 8Pro V10 file separate from the shared 8T/9R file. If using the older NiCkAM choices, compare the DSLR speed-labelled and SHARP quality-labelled files against your own capture needs.
The current index lists separate Carlos files for 8Pro and 8T/9R. Choose the exact model filename before adopting a shared-looking instruction sheet.
For the NiCkAM pair, make several similar everyday movement captures and count usable focused results. A source speed label is a starting hypothesis, not a measured result from this site.
Use the same stationary textured subject for the SHARP-labelled profile. Check halos, texture and shadow noise at equal size before deciding that more obvious sharpening means more useful detail.
Keep separate: OnePlus 8T; OnePlus 8 for 8Pro-specific files
The source labels NiCkAM8PRO-V6.4-DSLR-LMC-R15.xml for speed and the SHARP version for quality. Compare them on the actual phone; this website has not measured those claims.
Profile source / instructions ↗ Profile source / instructions ↗ Profile source / instructions ↗
Both indexes say snapcam or aweme is needed on stock OxygenOS. Older NiCkAM files are presented as speed and quality options; they are source community profiles, not measured comparisons by this site.
Release: R16
Package: snapcam or aweme on stock OxygenOS
Author: Not attributed in index
Release: R15 index; exact release unconfirmed
Package: snapcam or aweme on stock OxygenOS
Author: Not attributed in index
Release: R15 index; exact release unconfirmed
Package: snapcam or aweme on stock OxygenOS
Author: Not attributed in index
Use the documented 9R/8T V10 file with its R16 origin, then check the installed stock-OOS package before exploring auxiliary controls.
Choosing the configV10 provides the fuller documented baseline. Carlos V8 and the shared DSLR-labelled older file are alternative community profiles, so retain their older-index scope during comparisons.
OnePlus 9, 9 Pro and 9R have separate source entries. Select 9R explicitly; the numerical 9 label is not enough to choose a file.
V10's Cool option is described for overly warm/artificial-light output. Compare a white object and a face in the same indoor scene before changing the default color processing.
Load the older DSLR-labelled file only after saving the working V10 setup. Compare color and fine detail on the same scene rather than combining settings from both profiles.
Keep separate: OnePlus 9; OnePlus 9 Pro; OnePlus 9RT
Profile source / instructions ↗ Profile source / instructions ↗ Profile source / instructions ↗
Both indexes say snapcam or aweme is needed to access all cameras on stock OxygenOS. The source shares the Carlos profile between 8T and 9R; that does not verify 9/9 Pro or all OOS versions.
Release: R16
Package: snapcam or aweme on stock OxygenOS
Author: Not attributed in index
Release: R15 index; exact release unconfirmed
Package: snapcam or aweme on stock OxygenOS
Author: Not attributed in index
Release: R15 index; exact release unconfirmed
Package: snapcam or aweme on stock OxygenOS
Author: Not attributed in index
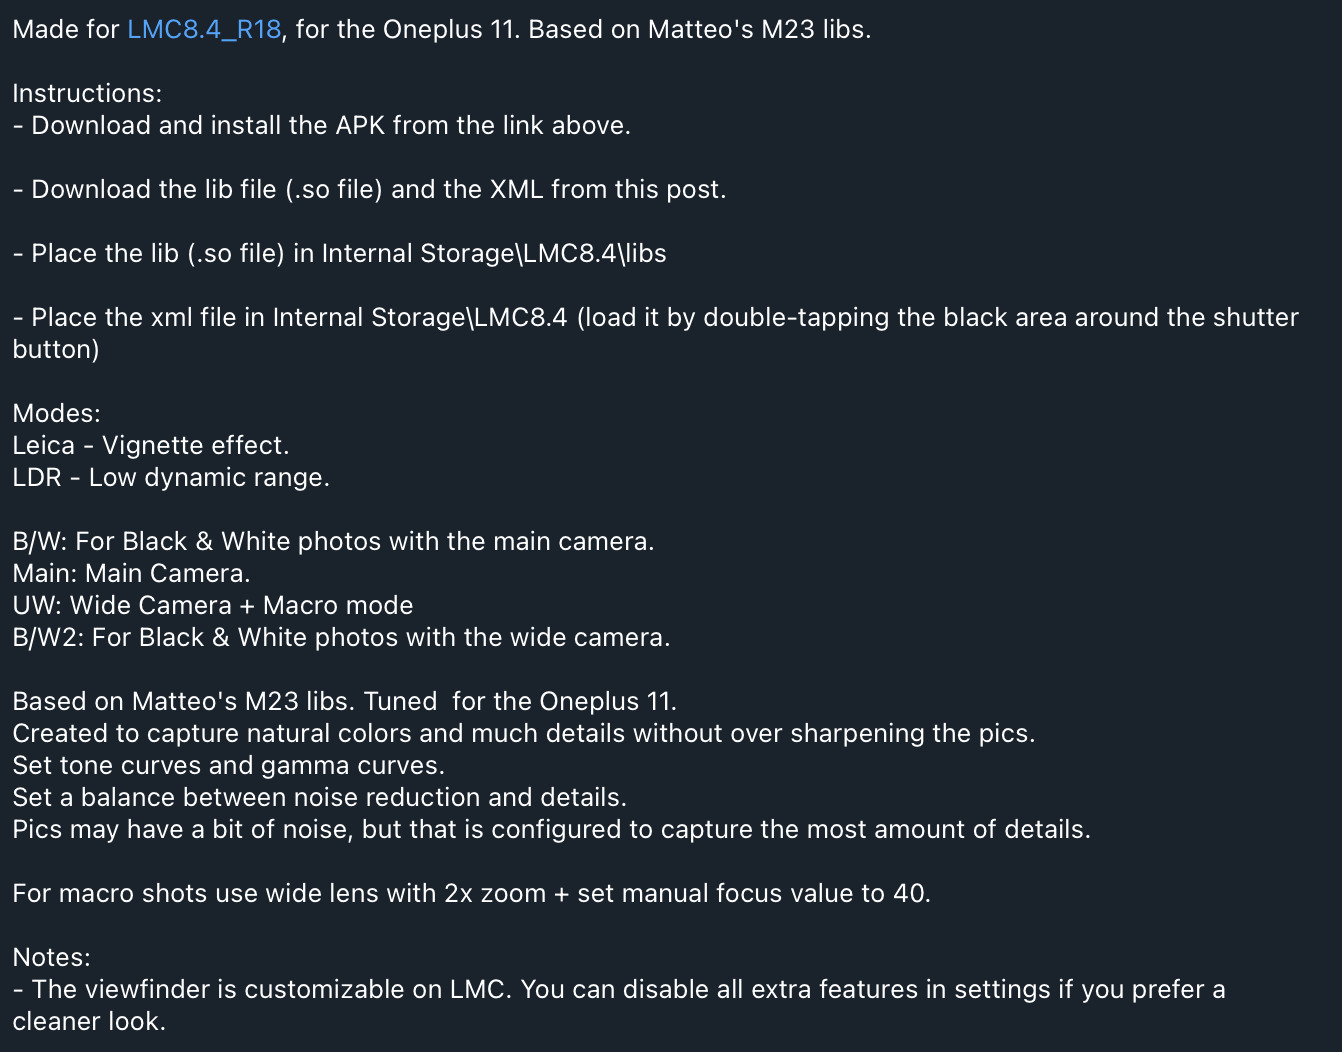
Use the documented R18 setup with both components: put M23 x OP11.so under /LMC8.4/libs/ and Carlos-V1-LMC-OP11.xml under /LMC8.4/, then import the XML from the shutter-area chooser.
Choosing the configThis is the exact OnePlus 11 profile in the catalog. Its library is an explicit dependency; the XML alone is not the complete documented setup.
Keep the .so filename unchanged and place it in /LMC8.4/libs/. If the imported output is wrong, confirm both files and paths before changing color or noise settings.
The instructions distinguish Main, UW, B/W for the main camera and B/W2 for the wide camera. Confirm ordinary color capture before comparing the monochrome variants.
The contributor suggests wide camera, 2x zoom and manual focus 40 for macro. Try that only after wide capture works, and adjust the subject distance using the saved focus result.
Keep separate: OnePlus 11R; OnePlus 12
The contributor specifies Internal storage/LMC8.4/libs/ for M23 x OP11.so, with the XML one level above in /LMC8.4/.
The instructions describe Leica as a vignette effect. The lens controls and creative effects are separate choices.
Profile source / instructions ↗ Profile source / instructions ↗
The index requires the accompanying M23 x OP11.so library and reports tested on R18. Its how-to image was not retrievable in this research pass. Do not present the XML alone as a fully verified setup.
Release: R18
Package: No verified package recommendation
Author: Not attributed in index
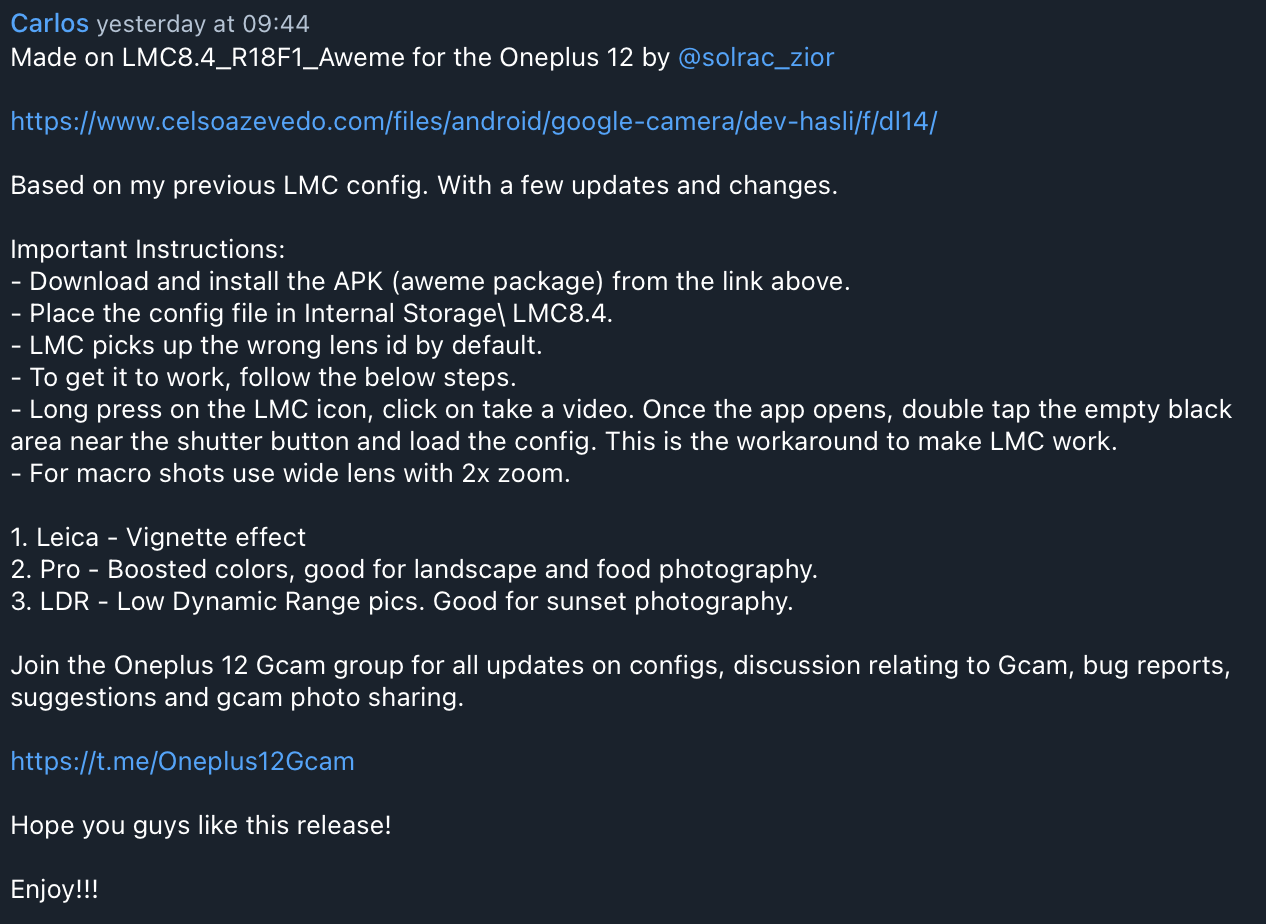
Use the contributor's R18F1 aweme setup, place the XML in /LMC8.4/, long-press the app icon and choose Take a video. Once open, double-tap the empty black area near the shutter to load the file.
Choosing the configThe source's release, package and startup workaround make this a more reproducible recommendation than a generic OnePlus 12 XML claim. Keep it scoped to Carlos V2 and verify behavior on the actual firmware.
A launch problem before XML import can reflect the contributor's wrong-default-lens-ID issue. Try the video shortcut and load the profile as instructed before declaring the whole setup unusable.
Carlos V2 describes Leica as a vignette, PRO as boosted color for landscape/food and LDR as a low-dynamic-range sunset option. Compare each with the ordinary result rather than enabling everything.
For macro, the instructions suggest the wide lens with 2x zoom. Test a stationary detailed subject after ordinary wide capture works, and inspect the saved focus instead of relying on the preview.
Keep separate: OnePlus 12R; OnePlus 11
For Carlos V2, the contributor documents a wrong default lens ID. Long-press LMC, choose Take a video and import the XML from the shutter-area chooser. This is profile-specific community advice.
Profile source / instructions ↗ Profile source / instructions ↗
The source explicitly credits carlos and assigns R18. Additional instructions are an image link; their details have not been transcribed here. No full device/ROM test was performed by this site.
Release: R18
Package: aweme (Carlos V2 instructions; made on R18F1)
Author: carlos
Confirm Nord CE 3 without Lite, then use the exact older labs.xml listing as a limited community starting point. Preserve its unconfirmed exact-release status.
Choosing the configAn exact model heading is preferable to importing the current Lite entry. Being located in an R15 index does not itself prove that labs.xml was tested on R15 or later APKs.
Check the full Settings model name before selecting a result. CE 3 and CE 3 Lite must return separate files even when a broad search omits the suffix.
The labs entry has little explanatory text. Save a daylight main photo and a selfie before exploring night/video or optional processing so that a failure has a clear starting point.
If you try labs.xml on a newer APK, record that as your own experiment with the actual version. Do not relabel it as a verified R18 profile because the import succeeds.
Keep separate: OnePlus Nord CE 3 Lite; OnePlus Nord 3
That substitution is not supported. The exact CE 3 listing is labs.xml in the older index, while CE 3 Lite has its own entry.
Profile source / instructions ↗ Profile source / instructions ↗
The exact Nord CE3 listing appears in the R15 index only. The current index has Nord CE 3 Lite, which is a different phone. Do not substitute a Lite profile or imply verified R16/R17/R18 support.
Release: R15 index; exact release unconfirmed
Package: No verified package recommendation
Author: Not attributed in index
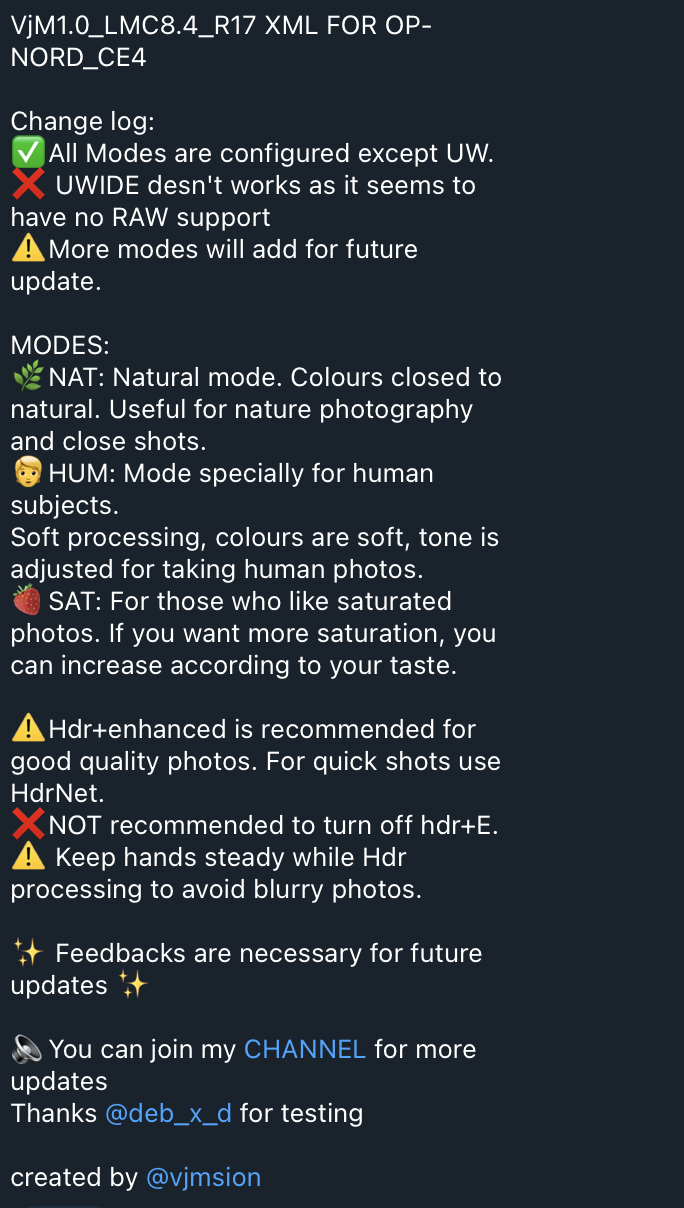
For the best-documented candidate, pair VjM1.0_LMC8.4R17_OP-NCE4.xml with R17. Do not expect its ultrawide button to provide a working camera based on this profile's notes.
Choosing the configOnePlusNordCE4.xml is another exact-model community option. Prefer the VjM file when you need explained behavior, while keeping the ultrawide limitation visible. The CE4 Lite-named file mixed into the heading is excluded.
VjM's NAT is described for natural/nature or close subjects, HUM for people with softer processing and SAT for greater saturation. Compare a matching subject rather than treating them as extra lens choices.
The contributor recommends HDR+Enhanced for quality and HdrNet for quick shots, with steady hands during processing. Test a static scene before using the slower path for moving people.
VjM says ultrawide does not work and suggests lack of RAW support as the contributor's explanation. Keep that explanation attributed; use a separate working camera path for wide shots.
Keep separate: OnePlus Nord CE 4 Lite; OnePlus Nord 4
Its read-me explicitly reports ultrawide unavailable and offers a contributor explanation about RAW support. This website has not independently verified that hardware/firmware diagnosis.
Profile source / instructions ↗ Profile source / instructions ↗
Current source heading is Nord CE 4 5G. It also contains a filename referring to CE4 Lite; that ambiguous file is excluded. Keep CE4 distinct from CE4 Lite, and do not infer exact tested release from filename alone.
Release: R16+ index; exact release unconfirmed
Package: No verified package recommendation
Author: Not attributed in index
Release: R17
Package: No verified package recommendation
Author: Not attributed in index
For a restrained-color comparison, begin with the Sharp file and an ordinary face/neutral-reference scene. If using the older stock-OS setup, follow its documented aweme package advice.
Choosing the configChoose Sharp versus the vibrant file by the subject and desired color, not by an assumed universal quality ranking. Keep 9 Pro+ distinct from 9 Pro and the separate Realme 9 SE/Speed entries.
The Sharp profile's source explicitly mentions selfies. Save a front-camera photo in even light and inspect skin texture and edge sharpening before using it as your default.
Compare the vibrant candidate with clothing or a white object in the same frame. This helps distinguish a deliberate saturation preference from a color cast.
The older 9 Pro+ section recommends aweme for all-camera access on stock OS. Record the actual firmware and package when checking that report.
Keep separate: Realme 9 Pro; Realme 9 5G SE; Realme 9 5G Speed
Profile source / instructions ↗ Profile source / instructions ↗
The R15 index explicitly says aweme is needed for all cameras on stock OS. Current files are described as grounded colors/sharp selfies and vibrant images respectively; these are source descriptions, not measured performance claims.
Release: R16+ index; exact release unconfirmed
Package: No verified package recommendation
Author: Not attributed in index
Release: R16+ index; exact release unconfirmed
Package: No verified package recommendation
Author: Not attributed in index
Release: R15 index; exact release unconfirmed
Package: aweme on stock OS
Author: Not attributed in index
Match the installed release first: NEO-2-LMC-8.4-R18-Fix.xml for the R18 assignment or NEO-2-LMC-8.4-R16-v.1.5.xml for R16. Use the R16 notes only with their matching profile.
Choosing the configThe release-specific Neo 2 files give the clearest current match. The shared NEO23T R15 entry is an older source-assigned option rather than a replacement for every newer profile.
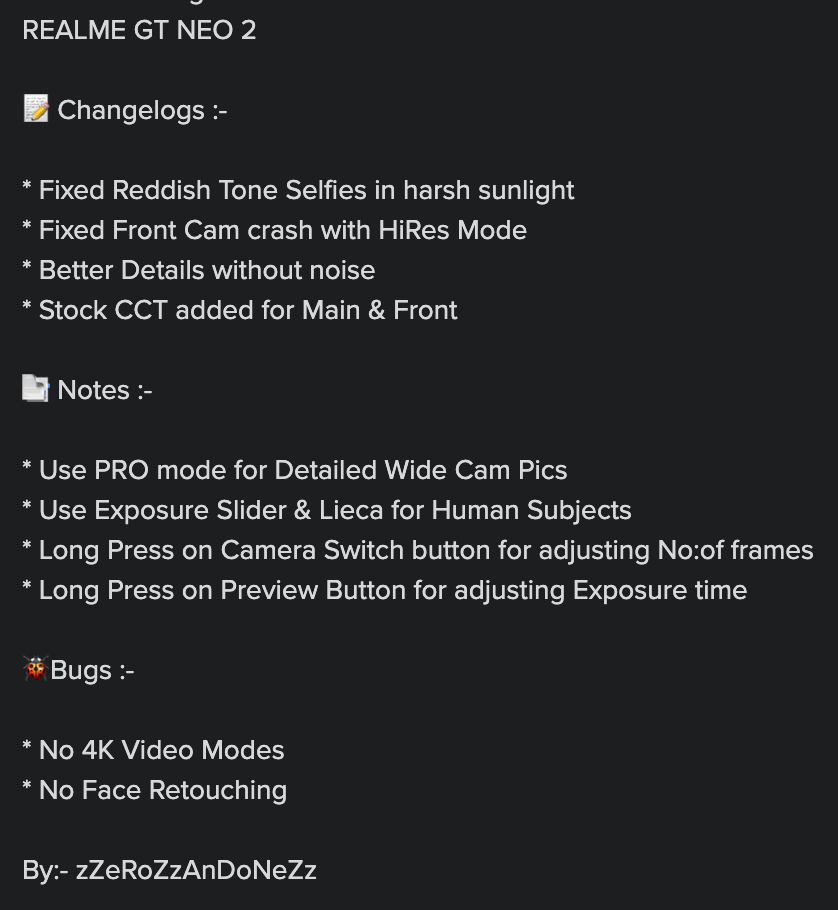
The R16 changelog reports a reddish-selfie correction and a front HiRes crash fix. Include a bright-light selfie in your comparison, keeping those improvements as contributor claims.
Its notes describe long-pressing the camera-switch button to adjust frame count and the preview button to adjust exposure time. Change one control at a time and preserve the original values.
The R16 contributor notes report no 4K video and no face retouching. Do not promise either feature on the basis of this XML.
Keep separate: Realme GT Neo 3; Realme GT 2
The recovered contributor notes say no 4K video. That limit is scoped to this R16 profile, not every camera app on the phone.
Profile source / instructions ↗ Profile source / instructions ↗ Profile source / instructions ↗
Current index explicitly assigns R18 and R16. The older shared Neo2/3T entry explicitly says created with R15. The R18 description link returned 404; no extra claim is inferred from it.
Release: R18
Package: No verified package recommendation
Author: Not attributed in index
Release: R16
Package: No verified package recommendation
Author: zZeRoZzAnDoNeZz (attributed in contributor image)
Release: R15
Package: No verified package recommendation
Author: Not attributed in index
Use LMC-8.4-R18F1-GTNeo3T.xml with its R18 assignment or NEO-3T-LMC-8.4-R17.xml with R17. Keep Neo 3T separate from Neo 3.
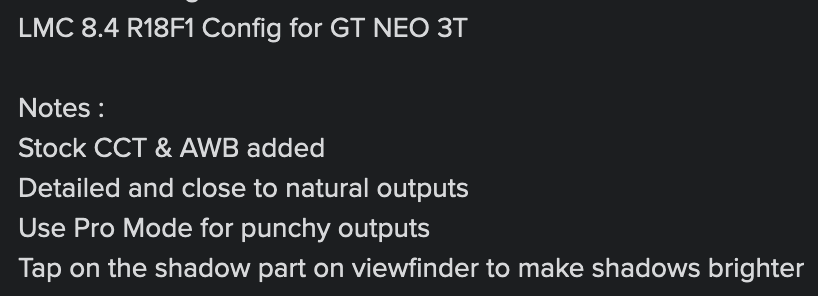
Choosing the configThe release match is the first decision. With R18F1, the contributor's ordinary-versus-PRO description gives a useful color comparison rather than a universal 'best quality' promise.
The R18F1 notes describe ordinary output as close to natural and PRO as punchier. Use the same foliage, face and neutral reference to decide how much color processing suits the scene.
The contributor suggests tapping a shadow area to brighten shadows. Compare the saved highlights too, so a brighter dark area does not hide lost sky or window detail.
The older NEO23T profile is explicitly created with R15. It is an older alternative for the documented Neo2/3T grouping, not evidence for Neo 3 or all GT phones.
Keep separate: Realme GT Neo 3; Other GT models without their own entry
Profile source / instructions ↗ Profile source / instructions ↗ Profile source / instructions ↗
Current index explicitly assigns R18 and R17. Older shared Neo2/3T entry says created with R15. Do not confuse GT Neo 3T with GT Neo 3 or other GT models.
Release: R18
Package: No verified package recommendation
Author: Not attributed in index
Release: R17
Package: No verified package recommendation
Author: Not attributed in index
Release: R15
Package: No verified package recommendation
Author: Not attributed in index
Confirm plain Narzo 50. Keep EyeCandy and Hazard as separate style files, with an ordinary stock/default-LMC color reference for judging their effects.
Choosing the configChoose EyeCandy for its described colorful everyday/portrait intent or Hazard for its distinct creative palette. Neither is established as the most accurate color profile or a compatibility choice for other Narzo variants.
Include an orange subject and green or gray surroundings, then inspect what the profile changes. Its palette is intentional creative processing rather than a claim of neutral product color.
Its source mentions boosted color and a vivid sky in PRO mode. Save an ordinary portrait and a sky scene separately so you can keep the option only where the effect helps.
For clothing, products or documentation, compare against the stock-camera reference before using a stylized file. Strong creative color can be appealing while changing the subject's apparent color.
Keep separate: Realme Narzo 50A; Realme Narzo 50i; Realme Narzo 50 5G
The current source describes Hazard-Shoron.xml that way. It is a creative contributor profile, so keep a neutral-color alternative for subjects that need accurate color.
Profile source / instructions ↗ Profile source / instructions ↗
Current source describes EyeCandy as a boosted-color/portrait look and Hazard as an orange/dark-green-gray post-apocalyptic look. These are aesthetic labels. Do not extend to Narzo 50A/50i/50 5G without evidence.
Release: R16+ index; exact release unconfirmed
Package: No verified package recommendation
Author: Not attributed in index
Release: R16+ index; exact release unconfirmed
Package: No verified package recommendation
Author: Not attributed in index
Release: R15 index; exact release unconfirmed
Package: No verified package recommendation
Author: Not attributed in index
Confirm iQOO Z3 and save a main-camera reference before importing Final-Iqoo-z3.xml. Keep the installed APK release and package in the setup note.
Choosing the configThe exact Z3 heading supports the shortlist. The file name provides no substantiated best-quality, all-camera or release assignment.
Check an ordinary saved photo and a selfie before judging the profile as complete. A confident filename does not replace a camera/mode checklist.
Use the same person in even daylight and one ordinary indoor light. Inspect saved skin color and focus; avoid carrying a lighting preference into every scene.
Z3 has its own source entry. The better-documented shared Z9/T3 file does not establish a replacement for Z3 by brand similarity.
Keep separate: iQOO Z9; Other iQOO Z-series models without their own entry
A community XML listing is verified; exact release, package and camera/ROM coverage are not stated by the index. Do not claim broader iQOO support.
Release: R16+ index; exact release unconfirmed
Package: No verified package recommendation
Author: Not attributed in index
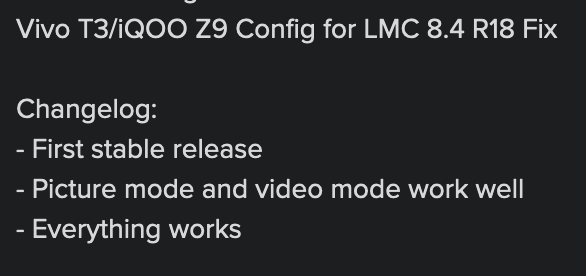
Confirm the exact regional Z9 model. Use the shared file with the contributor's R18 Fix context and verify ordinary still capture before the reported video behavior.
Choosing the configThe shared heading and explicit changelog provide a stronger setup reference than an unlabelled file. The 'everything works' wording remains an attributed community report.
Record the full model number, region and firmware when checking the R18 Fix profile. A shared marketing name does not resolve all regional hardware differences.
Make a short rear clip, play it back and inspect focus, orientation and audio. The contributor reports working video, but a saved still photo cannot verify that report.
Do not expand the shared file to Z9x or Z9s. The inspected source names Z9 and T3, not those suffix variants.
Keep separate: iQOO Z9x; iQOO Z9s; Other regional Z9 hardware without matching evidence
The recovered contributor changelog names LMC 8.4 R18 Fix. Its photo/video report is community evidence rather than this website's own test.
Profile source / instructions ↗ Profile source / instructions ↗
The source shares this profile with Vivo T3 but does not specify all regional variants or tested firmware. Match the exact phone; do not extend to Z9x/Z9s or unrelated regional hardware.
Release: R18
Package: No verified package recommendation
Author: Not attributed in index
Confirm plain Vivo T3 and its regional model, then use the shared file with the documented R18 Fix context. Keep another working camera option until still and video checks pass.
Choosing the configThe T3-specific heading plus shared changelog supports this candidate. It does not establish all T3-family or regional firmware support.
A broad T3 search should not return this profile for T3x, Pro or Ultra. Use the Settings model name to resolve the exact entry.
Save a face, a bright/shaded scene and a close detailed subject. Compare the completed files with a stock-camera reference before keeping the shared profile.
The contributor reports video working. Save and play back a short clip, then note the recording setting and firmware so your result is reproducible.
Keep separate: Vivo T3x; Vivo T3 Pro; Vivo T3 Ultra
Profile source / instructions ↗ Profile source / instructions ↗
The source shares this profile with iQOO Z9. T3x/T3 Pro/T3 Ultra are separate models. Region, exact release and package are not documented in the index.
Release: R18
Package: No verified package recommendation
Author: Not attributed in index
Confirm the exact Y20 variant and save an ordinary still before importing the current file. Treat a working photo and a working recording as separate checks.
Choosing the configUse the current Y20 heading to shortlist the videography-named file. Keep the older lmc.xml as a separate limited alternative with its R15-index context, not as a verified release-specific recommendation.
Record a short clip and play it back on the phone. Inspect focus, orientation and audio before relying on a videography-named profile for an event.
A profile chosen for a video-sounding name can still change still-image processing. Save a face and a neutral object before and after import to judge its everyday output.
If trying the older file, store a note that it came from the Y20 source section. A generic filename can otherwise be confused with a different phone's XML.
Keep separate: Vivo Y20i; Vivo Y20s; Other Y20 variants without matching evidence
No. The file is shared across several source entries, and the Y20 section does not provide a specific tested-video result. Record and play back a sample on the phone.
Profile source / instructions ↗ Profile source / instructions ↗
The current videography-named config is shared with several other phones. Its presence is not proof of working video or all-camera support on Y20. Keep Y20 variants and similarly named models separate.
Release: R16+ index; exact release unconfirmed
Package: No verified package recommendation
Author: Not attributed in index
Release: R15 index; exact release unconfirmed
Package: No verified package recommendation
Author: Not attributed in index
Confirm plain Edge 20. Use davlock.xml as the current community trial, saving a default-camera reference before comparing Edge20.1.xml.
Choosing the configThe exact Edge 20 headings justify both candidates. The current-index location and 20.1 filename do not establish a measured preference or tested-release match.
Keep the full Settings model name with the imported file. A nearby Edge 20 Pro profile or another Edge-series instruction is a different target.
Use a stationary distant subject and a nearby textured object. Check focus and saved detail before switching to a different XML on the basis of its age.
The selected Edge 20 entries do not supply a package rule. Keep the installed APK/package with any successful lens test so that the next import preserves a reproducible setup.
Keep separate: Motorola Edge 20 Pro; Motorola Edge 20 Lite
Profile source / instructions ↗ Profile source / instructions ↗
The indexes provide separate current and R15 references. Do not confuse Edge 20 with Edge 20 Pro or Lite. No exact tested release, package or firmware recommendation is documented.
Release: R16+ index; exact release unconfirmed
Package: No verified package recommendation
Author: Not attributed in index
Release: R15 index; exact release unconfirmed
Package: No verified package recommendation
Author: Not attributed in index
Confirm Edge 50 Pro, save the current settings and start with one ordinary daylight photo. Keep the filename's beta label visible in your setup notes.
Choosing the configThe exact Pro heading supports the shortlist. Treat the filename as contributor naming rather than upgrading it to a verified R18 compatibility result.
Save main and front samples after import, then try any exposed auxiliary controls. Keep a known working setup available while assessing the beta-labelled file.
Use small lettering and a textured subject, then view the saved image at equal size beside the reference. This reveals missed focus or heavy processing more clearly than a colorful preview.
Neo, Fusion and Ultra need their own evidence. Select the full Pro model rather than treating Edge 50 as one shared camera target.
Keep separate: Motorola Edge 50 Neo; Motorola Edge 50 Fusion; Motorola Edge 50 Ultra
R18beta appears in the filename. The inspected index does not independently state a tested-release result, so the catalogue preserves that distinction.
The filename labels the file R18 beta; the index itself supplies no tested-release confirmation. Keep Edge 50 Pro separate from Neo/Fusion/Ultra. This is a community profile with unverified camera/firmware coverage.
Release: R16+ index; exact release unconfirmed
Package: No verified package recommendation
Author: Not attributed in index
Confirm Moto G52 and save a stock/default-LMC reference with a face, neutral object and fine texture before importing sahabulfinal.xml.
Choosing the configThe file is selected because it is under the exact G52 heading. Final in the name does not establish stability, neutral color or complete mode support.
A face, white object and fine lettering in the same frame make color and texture differences visible without assuming an undocumented intended look.
The G52 source lacks a front-camera report. Save a selfie as part of the first check so the result matches the way you use the phone.
The G82 Kefir instructions explain different source files. Learn the actual G52 controls from saved output rather than transferring nearby G-series labels.
Keep separate: Motorola Moto G51; Motorola Moto G53; Motorola Moto G82
Community config exists but the index does not specify exact release, package, author, intended look or camera/firmware coverage.
Release: R16+ index; exact release unconfirmed
Package: No verified package recommendation
Author: Not attributed in index
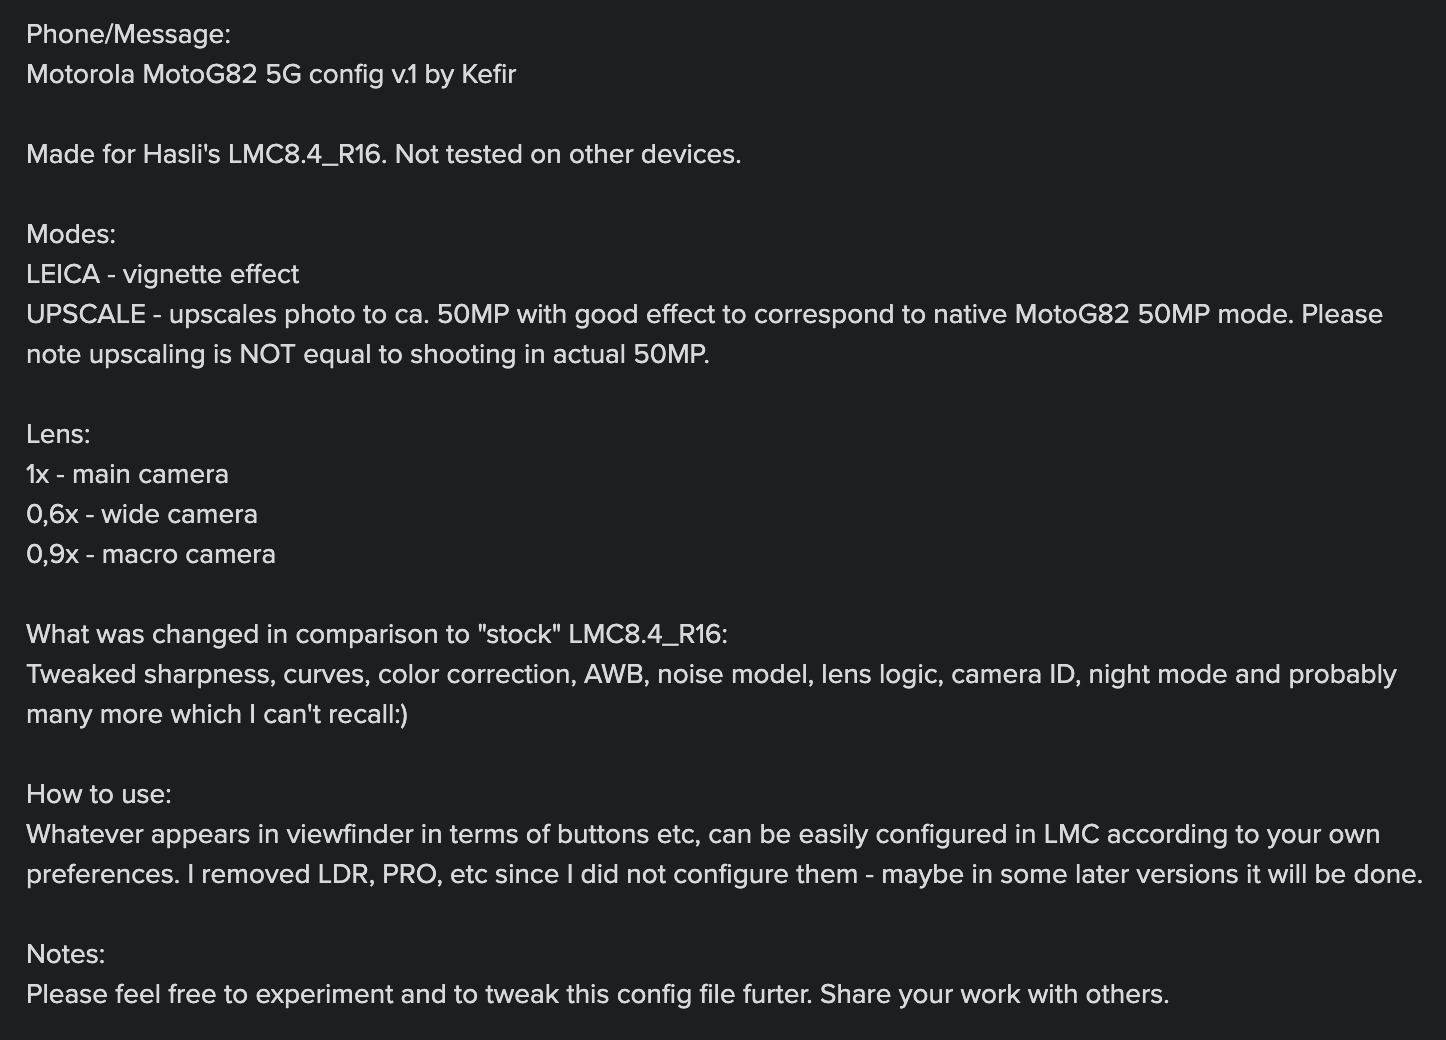
For an explained baseline, use the Kefir profile with R16 and leave UPSCALE off initially. Test the documented 1x, 0.6x and 0.9x controls separately.
Choosing the configKefir is the instruction-rich selected G82 candidate. Motog82Lmc8.4V1.0.xml is another current community file, and the older ORG-Stable file has a filename stability label without a test by this website.
Kefir's 0.9x button is described as macro, while 0.6x is wide and 1x main. Use a close detailed subject for macro and inspect the saved focus rather than assuming 0.9x is only digital zoom.
The contributor says the roughly 50 MP upscaled output is not actual 50 MP shooting. Compare fine detail and file size with the option off before deciding it helps.
Kefir notes that LDR and PRO were removed because they were not configured in this version. Keep the supplied baseline before adding viewfinder controls from another profile.
Keep separate: Other Moto G models without their own entry
That is the contributor's documented control label for this XML. Save a close-detail sample to verify its behavior on the phone.
Kefir explicitly says the upscaled output is different from actual 50 MP shooting. Judge useful saved detail rather than the larger pixel count alone.
Profile source / instructions ↗ Profile source / instructions ↗ Profile source / instructions ↗
Both current and R15 references exist. Stable in an old filename is a contributor label, not a stability test by this site. Extra Kefir description is linked as an image and has not been transcribed here.
Release: R16+ index; exact release unconfirmed
Package: No verified package recommendation
Author: Not attributed in index
Release: R16
Package: No verified package recommendation
Author: Kefir (attributed in contributor instructions)
Release: R15 index; exact release unconfirmed
Package: No verified package recommendation
Author: Not attributed in index
No verified recommendation in our catalog. Check your exact variant and source notes; a similar model is not enough.
Save these details with your backup. They make it possible to repeat a working setup or describe a problem accurately.
________________________
________________________
________________________
________________________
________________________
________________________
Copy this checklist into your own notes. This page does not submit or save your device information.
Source access: 14 October 2026. Release dates are shown separately. APK testing is reported by founder Muzamil Ahad; individual phone-test records are not currently published.
Founder & APK reviewer: Muzamil Ahad. How the guide was researched · Report a correction.